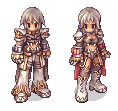
| Geneticist
|

|
| Job Base(s): |
Alchemist
Creator
|
| Job Type: |
3-2
|
| Changes At: |
Aldebaran
|
| Number of Skills: |
19
|
| Total Skill Points: |
91
|
| Total Quest Skills: |
0
|
| Job Bonuses
|
| STR |
AGI |
VIT |
INT |
DEX |
LUK
|
| +1 |
+5 |
+4 |
+11 |
+6 |
+1
|
|
Overview
Geneticists are the third class versions of Alchemists and Creators. When reaching Base Level 99, they're eligible to become a Geneticist. Alchemists who become a Geneticist can no longer transcend and thus cannot gain any transcendent skills (including Acid Demonstration) and it is always recommended to transcend and turn into a Creator before turning Third Job, as with any other Job in the game.
Geneticists are a rather complex Job that require a lot of hard work and dedication to master, but pays off greatly in the end with the ability to solo MVPs with ease and excel in performance at PvP. Geneticists are essentially the best MVP Job in the game in terms of versatility and damage per second, but they're also the most expensive Job to maintain. Everything about the Geneticist has improved from its former Creator self, including good Area skills and the ability to hit Ghost property monsters with Cart Cannon, much better plant summons, the ability to make even more powerful potions and bombs, and a new evolution of Homunculus that will grant powerful support abilities to its owner.
Whitesmiths already brought cart skills beyond the level of a Merchant Job with Cart Boost and High Speed Cart Ram, but Geneticists go even further. Improving the Whitesmith's Cart Boost by giving it attack boost, even better Movement Speed boost and adding new skills that allow Geneticists to battle using their cart as a weapon. the Geneticist has become a powerful Job capable of destroying any object in its way.
Job Change Guide
See Geneticist Job Change Guide for detailed information.
Changing into a Geneticist from an Alchemist or Creator requires the player to complete 2 tasks:
- Gaining knowledge about plants
- Learning more about carts
After completing these tests, the player will be transformed into a Geneticist. The test mostly takes place inside of the Geneticist's Lab in Lighthalzen.
Builds
Equipment
Homunculus
- Main article: Homunculus S
Here is a quick breakdown of the homunculus and their uses:
- Bayeri (Scope: PvM) - A tanky unicorn with attitude. Bayeri uses safety walls on his owner and provides Holy property area damage. However, its biggest weakness is that its area attack is interruptable, which makes it an unpopular choice of Homunculus S amongst most Geneticists.
- Dieter (Scope: PvM, PvP, WoE and MVP) - The most popular of the Homunculi S. Dieter provides his owner with a significant damage boost (which has the downside of possibly breaking weapons) as well as area damage against mobs. Dieter is very tanky, which combined with his awesome area ability, makes him possibly the best Homunculus S to AFK with.
- Eira (Scope: PvM, PvP and MVP) - Being one of the unfavorite Homunculi S that doesn't get enough attention, Eira should by no means be ignored. She has a special skill that provides her owner with ludicrous amounts of flee rate temporarily (sets Flee Rate to 500 when mastered), which can make a big difference in a dire situation. And speaking of defeat, Eira can be a great backup. With her resurrection spell, she'll bring her owner back from the dead so that embarrassing trip back to town can be avoided.
- Eleanor (Scope: PvM and PvP) - Probably one of the least loved Homunculi S, brings the damage but not much else. This fistcuff lover monk-like cat-lady will brutally beat the heck out of any target in sight, chaining together combo attacks that do decent damage. She has no area attacks, which makes her fairly useless in PvM except for picking off single targets. Mostly just played for aesthetics though.
- Sera (Scope: PvM, PvP, WoE and MVP) - The ultimate all purpose Homunculus S. This crazy bee-lady provides her owner with a massive damage reduction boost that buys her owner a window of opportunity to defeat an MvP (or another player) without being barraged with heavy damage. Very useful for solo PvM as well due to her area attack and paralyzing sting.
Job Data
Skills
| Skill |
Description |
Levels |
Type
|
|
|
Attaches a blood sucking plant that absorbs HP from a target to recover caster's HP. Requires a Bloodsuck Plant Seed.
|
5
|
Offensive
|
|
|
Increases Movement Speed by 50~100% and ATK by 10~50.
|
5
|
Supportive
|
|
|
Shoots a Cannon Ball from the Cart to deal damage to all enemies in a 3x3~7x7 area around the target.
|
5
|
Offensive
|
|
|
Increases the Cart Weight by 500~2500 and HIT of Cart Skills by 4~20. Also increases the damage with Cart Skills.
|
5
|
Passive
|
|
|
Spins the Cart to deal damage to all enemies in a 5x5 area around the user.
|
5
|
Offensive
|
|
|
Changes ingredients used for Pharmacy skills into another ingredient at random.
|
1
|
Active
|
|
|
Summons a huge plant mass that deals Earth property damage to all targets nearby and cancels any ground skills in the area.
|
10
|
Offensive
|
|
|
Creates explosives out of various kinds of fruit.
|
2
|
Active
|
|
|
Throws a Bottle Grenade at the ground to create a sea of fire to continually deal Fire property damage to all enemies in a 5x5 area and causing Burning status by chance.
|
5
|
Offensive
|
|
|
Throws an item on an area with Demonic Fire active, which causes various effects depending on the thrown item.
|
5
|
Offensive
|
|
|
Fully restores HP when cast and increases movement speed increases for the skill's duration. All stats +20%.
|
1
|
Active
|
|
|
Summons a plant from hell onto the ground, which deals damage in contact and causes Stun and Bleeding statuses by chance.
|
5
|
Offensive
|
|
|
Pulls a live Mandragora from the ground which releases a wild scream in a 11x11~15x15 around the user that, by chance, decreases INT by 4~20, drains SP by 30~50 and increases their Fixed Cast Time by 0.5~2.5 seconds of all targets nearby.
|
5
|
Active
|
|
|
HIT -50 and Hallucination status in a 9x9~29x29 area.
|
5
|
Active
|
|
|
Mixes various ingredients to create incredibly delicious food.
|
2
|
Active
|
|
|
Flings an item that is classified as a "throwing item" to a target.
|
1
|
Active
|
|
|
Creates a new variety of potions and drinks.
|
10
|
Active
|
|
|
Attaches an explosive mushroom spore to a target which explodes afterwards, dealing damage to all enemies in a 5x5~9x9 area around the target. Requires a Bomb Mushroom Spore.
|
5
|
Offensive
|
|
|
Increases ATK by 10~50 and HIT by 3~15 with One-Handed Swords.
|
5
|
Passive
|
|
|
Throws a thorny trap onto a cell which binds the enemy's feet, dealing damage over time. Requires a Seed of Horny Plant.
|
5
|
Offensive
|
|
|
Creates a barrier of thorns around a target location that deals damage in contact.
|
5
|
Offensive
|
Job Bonuses
| Stat/Amount |
+1 |
+2 |
+3 |
+4 |
+5 |
+6 |
+7 |
+8 |
+9 |
+10 |
+11
|
| STR
|
34 |
|
|
|
|
|
|
|
|
|
|
| AGI
|
8 |
20 |
29 |
40 |
47 |
|
|
|
|
|
|
| VIT
|
15 |
18 |
24 |
25 |
|
|
|
|
|
|
|
| INT
|
1 |
2 |
7 |
12 |
23 |
35 |
36 |
41 |
44 |
45 |
50
|
| DEX
|
3 |
6 |
13 |
19 |
28 |
39 |
|
|
|
|
|
| LUK
|
31 |
|
|
|
|
|
|
|
|
|
|
ASPD
