Difference between revisions of "Illusion of Vampire"
Terpsichore (Talk | contribs) |
Terpsichore (Talk | contribs) |
||
| (8 intermediate revisions by 2 users not shown) | |||
| Line 1: | Line 1: | ||
{{Infobox Field | {{Infobox Field | ||
|level = 140+ | |level = 140+ | ||
| − | |type = | + | |type = Illusion Dungeon |
|race = [[Brute]], [[Undead (race)|Undead]], [[Demon]], [[Plant]], [[Demihuman]] | |race = [[Brute]], [[Undead (race)|Undead]], [[Demon]], [[Plant]], [[Demihuman]] | ||
|element = [[Shadow]], [[Undead]], [[Ghost]] | |element = [[Shadow]], [[Undead]], [[Ghost]] | ||
| Line 12: | Line 12: | ||
To enter this dungeon you must speak to the '''Spell Knight''', standing in the tunnel below the Tower of Geffen, just outside of the ''Geffen's Dungeon''.<br> | To enter this dungeon you must speak to the '''Spell Knight''', standing in the tunnel below the Tower of Geffen, just outside of the ''Geffen's Dungeon''.<br> | ||
| − | The minimum base level required to enter is 140 and there's a fee of 20000 Zeny. | + | The minimum base level required to enter is 140 and there's a fee of 20000 Zeny.<br> |
This zone is a normal, open dungeon which features repeatable quests, equipment crafting as well as certain new mechanics.<br> | This zone is a normal, open dungeon which features repeatable quests, equipment crafting as well as certain new mechanics.<br> | ||
Those include a safe zone where monsters can't spawn, and they can't be dragged inside either, this is the hub with all relevant NPCs.<br> | Those include a safe zone where monsters can't spawn, and they can't be dragged inside either, this is the hub with all relevant NPCs.<br> | ||
| − | '''Thaumaturge''' will recover your HP/SP free of charge, with a cooldown of 5 minutes. Teleportation is disabled on this map. | + | '''Thaumaturge''' will recover your HP/SP free of charge, with a cooldown of 5 minutes. Teleportation is disabled on this map. |
| Line 29: | Line 29: | ||
== Tips == | == Tips == | ||
| − | This dungeon is intended as a party zone, as such it can be tough to tackle alone if you're in the intended level range. As teleportation is disabled, don't bite more than you can chew and advance carefully.<br> | + | This dungeon is intended as a party zone, as such it can be tough to tackle alone if you're in the intended level range.<br> |
| + | As teleportation is disabled, don't bite more than you can chew and advance carefully.<br> | ||
'''Bomi''' is Dracula's lover and right hand, she guards his domain and is a very dangerous spellcaster on her own.<br> | '''Bomi''' is Dracula's lover and right hand, she guards his domain and is a very dangerous spellcaster on her own.<br> | ||
| Line 44: | Line 45: | ||
Once again, a safe zone is employed, where the Church's members are stationed. '''Bomi''' and '''Enraged Dracula''' are bound to their domains and cannot be lured away.<br> | Once again, a safe zone is employed, where the Church's members are stationed. '''Bomi''' and '''Enraged Dracula''' are bound to their domains and cannot be lured away.<br> | ||
| + | '''Bomi''' spawns every 20 minutes after being defeated.<br> | ||
'''Ghastly Black Mushrooms''' have fixed spawns that are randomized, only three of them can spawn at a time and their spawn locations are spread across the map, this means that you can't just camp the same spawn! | '''Ghastly Black Mushrooms''' have fixed spawns that are randomized, only three of them can spawn at a time and their spawn locations are spread across the map, this means that you can't just camp the same spawn! | ||
| Line 66: | Line 68: | ||
| [[image:EnragedDracula.gif|link=|caption]]<br>{{Monster | id = 3757 Enraged Dracula}} || 159 || 6,970,816 || [[Size#Large|Large]] || [[Demon]] || [[Shadow|Shadow 4]] || 93,986,955 (MVP EXP: 35,715,045) || 75,189,570 | | [[image:EnragedDracula.gif|link=|caption]]<br>{{Monster | id = 3757 Enraged Dracula}} || 159 || 6,970,816 || [[Size#Large|Large]] || [[Demon]] || [[Shadow|Shadow 4]] || 93,986,955 (MVP EXP: 35,715,045) || 75,189,570 | ||
|} | |} | ||
| − | |||
| − | |||
== Related Quests & Content == | == Related Quests & Content == | ||
| Line 182: | Line 182: | ||
! Name !! Slot !! Stats | ! Name !! Slot !! Stats | ||
|- | |- | ||
| − | | [[image:EnragedDraculaCard.png|left|link=|caption]] {{item | id = 27104 Enraged Dracula Card}} || Garment || Enables the use of Lv.1<br>''Health Conversion''.<br>'''[Set Bonuses]'''<br>'''Bomi Card'''<br>Max HP +1000<br>Max SP +50<br>If the Garment is refined<br>to +9 or higher;<br>Max HP +1000<br>Max SP +50 | + | | [[image:EnragedDraculaCard.png|left|link=|caption]] {{item | id = 27104 Enraged Dracula Card}} || Garment || After-Cast Delay -10%<br>Enables the use of Lv.1<br>''Health Conversion''.<br>Every Refine Level above +4;<br>After-cast Delay -2%<br>'''[Set Bonuses]'''<br>'''Bomi Card'''<br>Max HP +1000<br>Max SP +50<br>If the Garment is refined<br>to +9 or higher;<br>Max HP +1000<br>Max SP +50 |
|- | |- | ||
| − | | [[image:BomiCard.png|left|link=|caption]] {{item | id = 27105 Bomi Card}} || Accessory || | + | | [[image:BomiCard.png|left|link=|caption]] {{item | id = 27105 Bomi Card}} || Accessory || Increases Magical damage<br>done to targets afflicted<br>by the ''Curse'' status by 10%<br>Autocasts Lv.3 ''Napalm Vulcan''<br>when physically attacking<br>by a chance.<br>'''[Set Bonuses]'''<br>'''Vampire's Servant'''<br>MATK +30 |
|- | |- | ||
| [[image:SweetNightmareCard.png|left|link=|caption]] {{item | id = 27101 Sweet Nightmare Card}} || Armor || MATK +20<br>Casting cannot<br>be interrupted.<br>Cast Time +15%<br>'''[Set Bonuses]'''<br>'''Vampire's Servant'''<br>Every 3 Refine Levels<br>of the Armor;<br>MATK +1% | | [[image:SweetNightmareCard.png|left|link=|caption]] {{item | id = 27101 Sweet Nightmare Card}} || Armor || MATK +20<br>Casting cannot<br>be interrupted.<br>Cast Time +15%<br>'''[Set Bonuses]'''<br>'''Vampire's Servant'''<br>Every 3 Refine Levels<br>of the Armor;<br>MATK +1% | ||
| Line 215: | Line 215: | ||
| {{item|id = 20840 Eidolic Ancient Cape [1]}} || [[Garments|Garment]] || 1 {{item|id = 2507 Ancient Cape}} || 15 {{item|id = 25255 Prismatic Stones}} || 200 {{item|id = 25263 Short Bat Furs}} || - | | {{item|id = 20840 Eidolic Ancient Cape [1]}} || [[Garments|Garment]] || 1 {{item|id = 2507 Ancient Cape}} || 15 {{item|id = 25255 Prismatic Stones}} || 200 {{item|id = 25263 Short Bat Furs}} || - | ||
|- | |- | ||
| − | | {{item|id = 28508 Eidolic Skull Ring [1]}} || [[ | + | | {{item|id = 28508 Eidolic Skull Ring [1]}} || [[Accessories|Accessory]] || 1 {{item|id = 2715 Skull Ring [1]}} || 6 {{item|id = 25255 Prismatic Stones}} || 50 {{item|id = 25266 Dried Yggdrasil Leaves}} || 50 {{item|id = 25264 Clumps of Nightmare}} |
|} | |} | ||
| Line 223: | Line 223: | ||
! Name !! Type !! colspan="4" | Materials | ! Name !! Type !! colspan="4" | Materials | ||
|- | |- | ||
| − | | {{item |id = 18149 Eidolic Ballista [2]}} || [[Bows|Bow]] || 1 {{item|id = 1722 Ballista}} || 21 {{item|id = 25255 Prismatic Stones}} || | + | | {{item |id = 18149 Eidolic Ballista [2]}} || [[Bows|Bow]] || 1 {{item|id = 1722 Ballista}} || 21 {{item|id = 25255 Prismatic Stones}} || 10 {{item|id = 25265 Glowing Spores}} || 150 {{item|id = 25270 Shaggy Manes}} |
|- | |- | ||
| {{item |id = 2039 Eidolic Wizardry Staff [2]}} || [[Staves#Two-Handed_Staff|Two-Handed Staff]] || 1 {{item|id = 1473 Wizardry Staff}} || 21 {{item|id = 25255 Prismatic Stones}} || 9 {{item|id = 25261 Ripped Paper Sheets}} || - | | {{item |id = 2039 Eidolic Wizardry Staff [2]}} || [[Staves#Two-Handed_Staff|Two-Handed Staff]] || 1 {{item|id = 1473 Wizardry Staff}} || 21 {{item|id = 25255 Prismatic Stones}} || 9 {{item|id = 25261 Ripped Paper Sheets}} || - | ||
| Line 229: | Line 229: | ||
| {{item |id = 28612 Eidolic Book of the Apocalypse [2]}} || [[Books|Book]] || 1 {{item|id = 1557 Book of the Apocalypse}} || 15 {{item|id = 25255 Prismatic Stones}} || 100 {{item|id = 25266 Dried Yggdrasil Leaves}} || 200 {{item|id = 25267 Suspicious Magical Circles}} | | {{item |id = 28612 Eidolic Book of the Apocalypse [2]}} || [[Books|Book]] || 1 {{item|id = 1557 Book of the Apocalypse}} || 15 {{item|id = 25255 Prismatic Stones}} || 100 {{item|id = 25266 Dried Yggdrasil Leaves}} || 200 {{item|id = 25267 Suspicious Magical Circles}} | ||
|- | |- | ||
| − | | {{item |id = 28022 Eidolic Infiltrator [2]}} || [[Katars|Katar]] || 1 {{item|id = 1266 Infiltrator [1]}} || | + | | {{item |id = 28022 Eidolic Infiltrator [2]}} || [[Katars|Katar]] || 1 {{item|id = 1266 Infiltrator [1]}} || 4 {{item|id = 25255 Prismatic Stones}} || 100 {{item|id = 25270 Shaggy Manes}} || - |
|- | |- | ||
| − | | {{item |id = 28023 Eidolic Legbone of Ghoul [2]}} || [[Katars|Katar]] || 1 {{item|id = 28004 Legbone of Ghoul [1]}} || | + | | {{item |id = 28023 Eidolic Legbone of Ghoul [2]}} || [[Katars|Katar]] || 1 {{item|id = 28004 Legbone of Ghoul [1]}} || 3 {{item|id = 25255 Prismatic Stones}} || 100 {{item|id = 25264 Clumps of Nightmare}} || - |
|} | |} | ||
Latest revision as of 11:59, 27 December 2021
| Illusion of Vampire | |
|---|---|
| |
| Information | |
| Level Range: | 140+ |
| Type: | Illusion Dungeon |
| Race(s): | Brute, Undead, Demon, Plant, Demihuman |
| Element(s): | Shadow, Undead, Ghost |
| Map(s): | gef_d01_i |
Overview
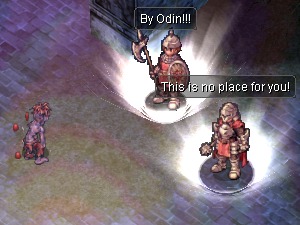
To enter this dungeon you must speak to the Spell Knight, standing in the tunnel below the Tower of Geffen, just outside of the Geffen's Dungeon.
The minimum base level required to enter is 140 and there's a fee of 20000 Zeny.
This zone is a normal, open dungeon which features repeatable quests, equipment crafting as well as certain new mechanics.
Those include a safe zone where monsters can't spawn, and they can't be dragged inside either, this is the hub with all relevant NPCs.
Thaumaturge will recover your HP/SP free of charge, with a cooldown of 5 minutes. Teleportation is disabled on this map.
Background and Lore
Similar to other Illusion Dungeons, this dungeon just appeared spontaneously, who knows how many more will follow the trend? Perhaps a recent accident altered the laws of nature, opening a way for such strange ocurrences, perhaps even the Aesir are involved. There's one alarming difference between the two zones though, it seems like Dracula is preparing for something, amassing the corpses of slain adventurers. Isn't that fairly strange if one considers that this place is a mere reflection of a past era?
The Church is in charge of the place once again, although far more experienced staff was dispatched since the dungeon is very dangerous.
Chat with them and they'll surely find a task or two for you.
Tips
This dungeon is intended as a party zone, as such it can be tough to tackle alone if you're in the intended level range.
As teleportation is disabled, don't bite more than you can chew and advance carefully.
Bomi is Dracula's lover and right hand, she guards his domain and is a very dangerous spellcaster on her own.
The curse of vampirism made her forget most of her former spells though, now she mostly employs shadow, ghost and poison magic.
Ghastly Black Mushroom isn't what it seems, it isn't going to just stand there letting you destroy it, instead it fights back with dark magic and nasty status effects.
That besides, this hardcore shroom will also drain life from agressors and it will be impossible to bring it down if you aren't attacking fast enough.
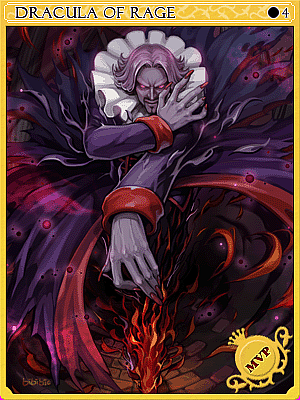
Enraged Dracula is in his prime, with the superhuman agility one gains from the curse of vampirism and the natural concealing abilities, he is hard to hit and must be constantly revealed.
Bloodsucking is more prevalent than ever, have a steady stream of damage and prevent his skill such as Blood Sucker, Wide Blood Drain and Vampire's Gift or he'll be recovering large amounts of HP.
The party should also watch out for Change Undead, Wide Decrease Agility and Wide Critical Wound as those skills will impair the ability to deal damage and to keep the Royal Guard in charge of devotion topped up.
Monsters
Once again, a safe zone is employed, where the Church's members are stationed. Bomi and Enraged Dracula are bound to their domains and cannot be lured away.
Bomi spawns every 20 minutes after being defeated.
Ghastly Black Mushrooms have fixed spawns that are randomized, only three of them can spawn at a time and their spawn locations are spread across the map, this means that you can't just camp the same spawn!
| List of Monsters | |||||||
|---|---|---|---|---|---|---|---|
| Name | Level | HP | Size | Race | Elements | Base EXP | Job EXP |
 Starved Drainliar |
143 | 143,334 | Small | Brute | Shadow 2 | 165,375 | 132,300 |
 Timeworn Zombie |
142 | 122,858 | Medium | Undead | Undead 1 | 141,750 | 113,400 |
 Restless Ghoul |
144 | 184,286 | Medium | Undead | Undead 2 | 212,625 | 170,100 |
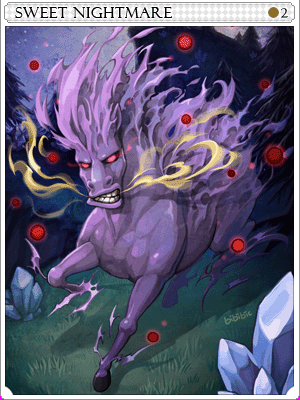
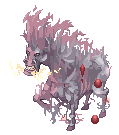 Sweet Nightmare |
145 | 163,810 | Large | Demon | Ghost 3 | 189,000 | 151,200 |
 Ghastly Black Mushroom |
150 | 100 | Small | Plant | Shadow 1 | 945,000 | 945,000 |
 Bomi |
147 | 1,096,623 | Medium | Demihuman | Undead 1 | 7,032,630 | 4,922,895 |
 Enraged Dracula |
159 | 6,970,816 | Large | Demon | Shadow 4 | 93,986,955 (MVP EXP: 35,715,045) | 75,189,570 |
Related Quests & Content
Once again, two sets of quests are available, repeatable EXP quests, limited to the 140-160 level range, and quests that provide Prismatic Stones needed for the equipment crafing, doable as long as you're able to enter the zone.
Brawler Pridbor - Experience Quests

| Quest | Reward |
|---|---|
| Harbingers of Vampirism | Experience |
| The Walking Dead | Experience |
| Nightmarish Steeds | Experience |
Stavrophore Nicodemus - Item Quests

| Quest | Reward |
|---|---|
| The Vampire's Bride | 1 Prismatic Stone |
| Ashes to Ashes, Dust to Dust | 1 Prismatic Stone |
| Not so Natural Remedy | 1 Prismatic Stone |
Mission Board's Hunting Quest
Mission Board's Collection Quest
Loot
All normal monsters drop their base equipment at an increased rate plus what's listed below.
| Notable Zone Drops | ||
|---|---|---|
| Item | Monster | |
 |
Restless Ghoul | |
 |
Restless Ghoul | |
 |
Sweet Nightmare | |
 |
Sweet Nightmare | |
 |
Starved Drainliar | |
 |
Starved Drainliar | |
 |
Bomi | |
 |
Bomi | |
| Enraged Dracula's Drops | |
|---|---|
| Item | Drop Chance |
 |
100% |
 |
50% |
 |
25% |
 |
15% |
 |
15% |
 |
10% |
 |
5% |
 |
15% |
 |
15% |
 |
0.01% |
 |
3% |
 |
25% |
 |
100% |
| Cards | ||
|---|---|---|
| Name | Slot | Stats |
 |
Garment | After-Cast Delay -10% Enables the use of Lv.1 Health Conversion. Every Refine Level above +4; After-cast Delay -2% [Set Bonuses] Bomi Card Max HP +1000 Max SP +50 If the Garment is refined to +9 or higher; Max HP +1000 Max SP +50 |
 |
Accessory | Increases Magical damage done to targets afflicted by the Curse status by 10% Autocasts Lv.3 Napalm Vulcan when physically attacking by a chance. [Set Bonuses] Vampire's Servant MATK +30 |
 |
Armor | MATK +20 Casting cannot be interrupted. Cast Time +15% [Set Bonuses] Vampire's Servant Every 3 Refine Levels of the Armor; MATK +1% |
 |
Headgear | Grants immunity to Burning status. [Set Bonuses] Vampire's Servant Perfect Dodge +10 |
 |
Armor | ATK +20 Turns the Armor unbreakable. [Set Bonuses] Vampire's Servant Every 3 Refine Levels of the Armor; ATK +1% |
Crafting
Bishop Eleazar
Our glum friend is back, after the endless stream of failures in the previous dungeon, he was relocated here instead. But it seems like bad luck trails him so he isn't making any progress here either. Being already experienced in the matters of infusing equipment, he figured out the way to handle the loot inside this dungeon pretty quickly. The process is a bit more extreme as it requires blood and burning an offering, but ultimately, it means the same for you;
access to amazing equipment. Just bring him the base item plus all the required material and watch the fireworks.
| Armor Crafting | |||||
|---|---|---|---|---|---|
| Name | Type | Materials | |||
| Eidolic Ring [1] | Accessory | 1 Ring [1] | 21 Prismatic Stones | 6 Ripped Paper Sheets | 20 Glowing Spores |
| Eidolic Ancient Cape [1] | Garment | 1 Ancient Cape | 15 Prismatic Stones | 200 Short Bat Furs | - |
| Eidolic Skull Ring [1] | Accessory | 1 Skull Ring [1] | 6 Prismatic Stones | 50 Dried Yggdrasil Leaves | 50 Clumps of Nightmare |
| Weapon Crafting | |||||
|---|---|---|---|---|---|
| Name | Type | Materials | |||
| Eidolic Ballista [2] | Bow | 1 Ballista | 21 Prismatic Stones | 10 Glowing Spores | 150 Shaggy Manes |
| Eidolic Wizardry Staff [2] | Two-Handed Staff | 1 Wizardry Staff | 21 Prismatic Stones | 9 Ripped Paper Sheets | - |
| Eidolic Book of the Apocalypse [2] | Book | 1 Book of the Apocalypse | 15 Prismatic Stones | 100 Dried Yggdrasil Leaves | 200 Suspicious Magical Circles |
| Eidolic Infiltrator [2] | Katar | 1 Infiltrator [1] | 4 Prismatic Stones | 100 Shaggy Manes | - |
| Eidolic Legbone of Ghoul [2] | Katar | 1 Legbone of Ghoul [1] | 3 Prismatic Stones | 100 Clumps of Nightmare | - |
Alukah
This talkative vampire bat is in a predicament, Dracula has been hoarding all the corpses and thus blood to himself, which caused the population of bats to starve. Alukah will gladly part with one of his brothers in exchange for revenge, and some fizzy drinks. Send Dracula back to the coffin a few times, cull the population of bats that compete with our friend, obtain some bloody sodas and this strange accessory with a real, unliving vampire bat is yours!
| Accessory Crafting | |||||
|---|---|---|---|---|---|
| Name | Type | Materials | |||
| Vampire's Servant [1] | Accessory | 10 Well-Dried Clover | 400 Short Bat Fur | 10 Blood Flavored Soda | |
| Illusion Dungeons |
|---|
| Illusion of Moonlight • Illusion of Vampire • Illusion of Ice • Illusion of Abyss |