Crescent in the Noon
| Crescent in the Noon | |
|---|---|
| |
| Information | |
| Level Range: | 100/140/160+ |
| Party Requisites: | 1+ Player |
| Quest Prerequisites: | None |
| Duration: | 60/75/90 Minutes |
| Cooldown: | 23 Hours |
Contents
Overview
The biggest instance to date, it features three difficulty modes which cover the whole level 100~175 range. This flexible instance has something for everybody.
Each difficulty adds one additional boss fight and new equipment, while boosting the overall drop rates.
The cooldowns are exclusive to each difficulty so you can run all three modes every day.
Unlocking a higher difficulty, requires you to fully complete the previous, and to have the appropriate Base Level, which would be 100 for Easy Mode, 140 for Normal Mode and 160 for
Hard Mode. It is possible to finish the Easy Mode without dealing with the final boss, which allows you to complete the main quest and receive EXP, but won't count toward completion.
Upon completing the Easy Mode once, you will receive the ![]() Necklace of the Priestess (once per account), which can be given powerful enchants, going up to 3 stages.
Necklace of the Priestess (once per account), which can be given powerful enchants, going up to 3 stages.
Besides the normal drops, there's also a shop managed by Shohreh which sells a wide array of articles, from equipment to consumables and Mercenary Scrolls. This shop
uses instance's own currency, ![]() Dream Debris, and completing higher difficulty modes, unlocks additional articles.
Dream Debris, and completing higher difficulty modes, unlocks additional articles.
The difficulty mode is managed by the party's leader, and cannot be modified once set, while the instance is active. Party members are able to change their own difficulty mode before going inside, which is done with the aid of High Priestess Niren. All the modes are managed through a single script so it might appear complex on paper, but the switching is pretty straightforward.
You will be met with quite a lot of lore on your way through the instance, with additional bits coming from higher difficulties. Once you have completed a difficuilty, you will be able to skip the dialogues and scripted events that it features. Meaning that completing Easy Mode will allow you to skip the parts exclusive to it, in both Normal and Hard Modes.
This instance is also the first one to feature the custom Instance Reentry System.
Background and Lore
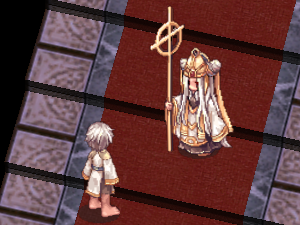
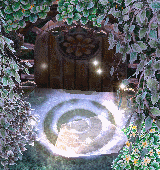
As you stride through the ancient city of Rachel, your attention is caught by High Priestess Niren, standing near a strange portal and surrounded by servants.
She's seeking the aid of foreign adventurers who aren't involved in any way with the local political and religious dramas, and Midgardians fit the bill!
The Pope of Arunafeltz is stuck in a catatonic state, spending most of the day asleep, and daydreaming when awake, barely responding to the world around. Niren suspects that
something from her dreams is keeping the girl trapped, she conjured a portal which allows one to enter that dreamworld as a participant, and needs your help with the exploration.
You're asked, and threatened to keep the whole matter under secret, and it is in your best interests to do so, as the Cult does not mess around with their threats.
If you agree, you will be able to witness and influence events which affect the existence of the Arunafeltz Republic at a whole, to learn about its dark past, the tragic story of The Pope,
her twin brother and the role of the Ice Salamander Ktullanux. Some light will be shed on he nature of the Cult of Freyja and its upper echelon of Freyja's servants.
Completing each difficulty, reveals more of the complex net of stories cast upon the republic, although that only leaves even more loose ends.
You're promised riches and potent magical equipment for your aid and discretion, and that you will obtain, although the greatest reward is preventing the Arunafeltz Republic
from plunging into chaos, at least for some time, as the future is uncertain and the machinations of the Cult may have gotten out of hand a long time ago...
Tips
Most of the run consists of you meeting large packs of guards and fanatics, with some undead dogs. All the encounters have a fixed location, with three non-scripted ambushes inside of the city.
Proper positioning and use of the Pope's mercenary abilities, can make the fights considerably easier.
Temple Guards are sturdy defenders of Freyja's sacred places, employing abilities one would expect from Crusaders, but also those of Rogues, due to their nomadic heritage.
Fanatics are crazed melee fighters who may perform suicidal attacks in higher difficulties, while Zealots are competent spellcasters and healers.
Tracking Undogs are undead servants risen by a joke of Freyja's perhaps. They're quick, agile, deadly yet fragile, and may come back to unlife once destroyed.
It may be a bad idea to tackle the whole group at once in higher difficulties, as they're much sturdier and support each other. Separate them first!
Freyja's Bishop is a miniboss that you will have to defeat multiple times through the run.
These old servants of the Goddess are versatile, defensive fighters and spellcasters, employing a wide array of priestly abilities.
Make sure to move them out of the special Sanctuary effect, and to avoid the special Magnus Exorcismus which will damage you regardless of your element.
In higher difficulties, the bishop has considerable healing abilities which require steady damage output from your part if you wish to progress.
Boss fights feature a wide array of unique abilities, mechanics and AI behaviors.
The traditional tank and spank tactics will not work, and gone are powerhouse abilities such as Earthquake, Hell's Judgement, constant Dispel and Speed Up/Power Up.
Reacting to the various mechanics and moving when required is required, bruteforcing will not work well in this instance. This also implies that small groups are favored over alt trains.
Managing many buffslaves will be exceedingly hard with the fight's mechanics and mobility requirements. Bring a tight-knit and prepared group of wary players instead.
The tank won't be taking brutal damage, but still requires proper support and healing. Alternative tanks are preferred, such as mobile or FLEE based ones.
Loomin
This grieving brother appears to be slow and aloof, but has a wide array of tricks under his sleeve, both of his own creation and also those taught by Ktullanux.
It is recommended to have a tank with moderate mobility which can avoid attacks and pick up the child quickly.
Movement and repositioning are the keys during this battle. While most of the attacks aren't particularly deadly, failure to react and deal with Frozen Hearts could easily result in a wipe.
Focusing on spellcasting with a few minor physical attacks, Loomin is sturdy and has the tendency to move around with Back Sliding, which is chained into a painful Soul Strike.
He will also chase players with Body Relocation and the consequent Moon Slasher.
Loomin doesn't enjoy getting touched by those he considers unclean, so he will often remove grounds effects under himself with Ganbantein, followed by Pneuma.
His normal attack abilities include a wide array of Water, Neutral and Ghost property physical and magical abilities, Those may target random players, the tank, or both.
Watch out for his special attacks, such as Flash Attack or Wide Frost Diver.
The tank will be getting some of his SP burned at intervals, through Mental Breaker.
In higher difficulties, he may silence the group or damn them with Wide Silence and Wide Curse.
The tank may be disabled with Ice Blast, which inflicts guaranteed, short duration Crystallization.
Higher difficulties add more abilities to the repertoire, and as usual, the lower the HP, the more abilities are unlocked.
Some key cases are signaled by a flavor text and a cast time you can react to, those are underlined below.
| Loomin's Special Abilities | ||
|---|---|---|
| Ability | Flavor Text | Description |
| Gravitation Field | A waste of breath the years behind, In balance with this life, this death! | Prioritizes a random player who isn't the tank. This special version of the High Wizard's ability deals 10% of Max HP as damage every 0.5s, so try to move out as fast as possible. Loomin is able to move and act while the field remains. |
| Akaitsuki | There's no recovery from a stolen dream... | Only the tank may be targeted. Just like the normal ability, it reverses the healing taken, turning it into damage instead. Lasts for 10s. |
| Divine Shield | Stop sullying me with your venom!!! | Places a shield with a value equal to 10% of Max HP which absorbs all types of damage and lasts for 1m. |
| Summon Frozen Heart | Has your heart been pierced, frozen and shattered? | Prioritizes a random player who isn't the tank. Summons one Frozen Heart, which is a stationary monster under Plant protocol. It will cast Wide Chill in a 5x5 area while using Snowflake Barrage and Cold Bolt. Once spawned, a timer will appear on top of this monster, and if it isn't destroyed before the timer runs out, the Frozen Heart will self destruct, using Ice Explosion, which deals very high physical, Water property damage in a 19x19 cell area and inflicting unavoidable Crystallization plus Bleeding statuses. |
| Gravity Crash (Normal Mode+) | Suffer the weight of the world just as I have! | Screen wide spell which deals miscellaneous damage based on a percentage of Max HP and the currently carried weight. Also forces the targets to sit down and roots them for 10s, with the root's effect blocking the use of movement skills. Sitting down manually before this ability hits, will halve its damage and prevent the forceful sit down plus root effects. |
| Dispel (Hard Mode) | You don't deserve those boons... | Targets a random player who isn't the tank, and if there are no other players around, this ability isn't used. |
| Internal Collapse (Hard Mode) | On the left palm is my dwindled hope, the envoy of your unmaking. | One random player who isn't the current tank is prioritized, becoming a living bomb. The effect is signaled by a ticking sound, an expanding circle, and a timer over the target's head. Once 5s have passed, the target will explode, taking 90% of own Max HP as miscellaneous damage, and inflicting half of that to all allies in a 17x17 cell area around, knocking them back 5 cells. |
| Target Change (Hard Mode) | /dum emotion | Loomin will simply ignore players under the Steel Body status, picking a new target instead! |
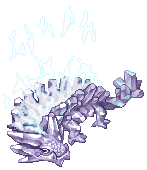
Reflection of Ktullanux
Unlike other incarnations of the legendary Ice Salamander, in this dreamworld, he focuses on brutal physical attacks and treacherous spellcasting of Nifelheim instead of raw Water magic.
Not as tricky as Loomin, the Ice Salamander prefers to inflict devastating direct damage with a combination of Water and Neutral property physical attacks, as well as Ice Breath and Splash Attack.
While deadly, his HIT rate is fairly low, and thus having a FLEE focused tank may help avoid a large portion of damage entirely, while beefy tanks could be taking too much damage to keep up.
The tank will be sometimes getting hit by Shatter Barrier, which removes defensive boons and inflicts miscellaneous damage based on a percentage of Max HP multiplied by the number of boons removed.
Pile Bunker is used constantly if the tank is under the effect of Steel Body.
The Ice Salamander will empower himself with Weapon Quicken and Auto Guard fairly often, so having somebody to remove those buffs will make the fight considerably easier.
Not to say that he forgot the use of Water magic, Jack Frost, Frost Nova and random targeted Lightning Spear of Ice are used from time to time, although his MATK value isn't high.
Debuffing consists of Wide Freeze, Wide Bleeding and random targeted Water Escape Technique.
Ice Blast is used from time to time once the beast's HP hits a low level.
Higher difficulties add more abilities to the repertoire, and as usual, the lower the HP, the more abilities are unlocked.
Some key cases are signaled by a flavor text and a cast time you can react to, those are underlined below.
| Reflection's of Ktullanux Special Abilities | ||
|---|---|---|
| Ability | Flavor Text | Description |
| Power Up | Perhaps I must sharpen my fangs. | Just the normal ability we all know, the important factor is that Shatter Barrier is no longer used while this buff is active. |
| Snowflake Barrage | May your shattered bones bite the permafrost beneath! | Casts 12 instances of Falling Ice Pillar in 2.4s, dealing 250% of MATK per hit while voiding the chance to Freeze this ability normally has. |
| Status Down | Giving more than you can take, little are minds of men. | Prioritizes a random player who isn't the tank. Decreases All Stats by 30% for 30s. |
| Wide Crystallization | On the seventh day, a blizzard came... | Coming right after a full screen Ganbantein, this ability inflicts Crystallization status to everyone on sight. |
| Maximized Pain | A fellur austan um eitrdala soxum ok sverdum, Slidr heitir su. | Turns invulnerable for 10s while reflecting a percentage of the damage that would be received onto all enemies in view range, changing own color for the duration. The end of this status is notified through red text. |
| Summon Ice Colossus | You too must taste my unbridled wrath. | Summons one Ice Colossus in an area around self. This walking glacier is very slow, but also exceedingly powerful. Upon spawn, it will pick a random target, homing onto it for 1m, and picking a new one after that time is over. Dealing extremely high physical damage of Water and Neutral properties, and using some Water spells, the Colossus will chase its current target until death. Shatter Barrier will be used frequently, and being hit by a physical attack will activate Stone Skin while being hit by a magical, will replace it with Anti Magic. Getting trapped, will cause the Colossus to cast Wide Frost Diver followed by Percentual Heal (10%). There is also a timer, which will appear on top of the monster upon its spawn, and once it runs out, the Colossus will become enraged, gaining Power Up and using physical attacks on chase. This monster isn't of Boss protocol but cannot be knocked back. |
| Ice Explosion (Hard Mode) | I AM THE NIFLHEIM!!! | Deals massive physical, Water property damage in a 19x19 cell area around and inflicts unavoidable Crystallization plus Bleeding statuses. |
| Ice Tomb (Hard Mode) | The frozen waters of Fimbulthul wish to skewer your flesh. | Prioritizes a random player who isn't the tank. Traps the target in a cage of Ice Walls for 10s and sets up an Ice Mine inside, which goes off after a second, dealing 50% of Max HP as miscellaneous, Water property damage and inflicting Chill status. Note that multiple players may be trapped if they're too close. |
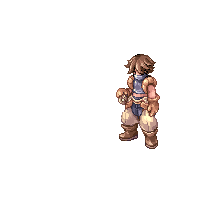
The Pope
This optional fight, is divided into two different stages, with fairly different combat dynamics and mechanics.
The Pope will begin in her casual outfit (Waning Moon), going onto brutal offensive, employing assassination techniques and tricks
of stealth that she's been taught by a nameless killer who attempted against her life, but was caught and disarmed by the girl.
Taking a liking to the girl, and being indebted to her kindness, he taught her all the secrets of the trade, which she infused with her own holy spells.
This is a hectic phase, with The Pope moving around all the time, changing targets and attempting to quickly eliminate them.
Quick use of defensive abilities is required, paying attention to the targeted players.
Her normal set of attacks includes two combos, high level Holy Cross plus Triple Attack, and Cross Impact plus Critical Slash.
Attempting to kite her, will be met with Charge Attack and Windmill.
Random targets might get hit by Cross Ripper Slasher, and also those she's chasing.
The tank will be constantly getting punished by Pressure and Holy Punishment, which is a Neutral property spell that causes forced Silence and splashes around.
Random targets may get hit by Confessio, which casts a flurry of 9 low level Holy Punishments. Move away from the targeted player!
As her HP dwindles, the party will get debuffed by Wide Decrease Agility, and those close to her, by Wide Lex Aeterna.
The traditional idea of tanking does not work during this fight. Anyone may be targeted, and The Pope doesn't change her aggro in any normal way.
The targeted player must be protected and kept alive, until a new victim is chosen.
Some key abilities are signaled by a flavor text and a cast time you can react to, those are underlined below.
| The Pope's (Waning Moon) Special Abilities | ||
|---|---|---|
| Ability | Flavor Text | Description |
| Metamorphosis | Uhm... I will don my trappings now. | Upon reaching 50% of Max HP, The Pope will turn invulnerable and spend 6s changing clothes, entering the second phase of the fight and banishing all active Merkabahs. |
| Buff Round | I forgot to buff myself at the start... | The Pope buffs herself with Lv.100 Blessing, Lv.48 Increase Agility and Adjustment. |
| Target Change | I hope your friends aren't as dull. | Coming right after Lv.1 Speed Up (NPC_AGIUP), The Pope drops her current target and picks a new one. |
| Sanctuary | Please stop, you're getting my new clothes dirty! | Casts Ganbantein and drops a special version of Sanctuary on self, which recovers massive amounts of HP yet doesn't affect enemies. |
| Call Merkabah | I knocked and knocked, yet the secrets are kept locked. | Invokes one Merkabah, which is a stationary slave, but if The Pope is dragged too far away, she will recall it back next to her. This servant will cast Renovatio on self upon spawn, beginning to support The Pope with abilities such as Divine Shield, Assumptio, Expiatio and Heal, becoming more supportive as her HP depletes. Lv.3 Wide Stun will be cast when Merkabah's own HP depletes. |
| Perfect Invisibility | The Moon is waning, and so your story is coming to its end. | Becomes completely invisible for 15s while increasing Movement Speed. This effect cannot be canceled by damage or any revealing abilities. Right after, she picks a new target and brands it with Stigmandum, which is a more powerful, single-target version of Oratio that also reduces FLEE and increases the chance to get Critically hit. The marked target will be hit by Lv.10 Joint Beat, Lv.20 Bash and Lv.2 Holy Light combo every second. |
| Holy Stampede | Will your remains burst into bright fragments of eternity if I do this? | Prioritizes a random player who isn't the tank. Once the cast time finishes, The Pope will charge the targeted player, dealing very high, Neutral property physical damage and Stunning for 5s. This is followed by a second hit, which causes moderate Holy property physical damage in a 9x9 cell area around the target, inflicting Blind and Decrease Agility. The initial portion can be blocked by Pneuma, and the splashed damage, by Safety Wall. It is also possible to stop the cast by breaking line of sight. |
During the second stage of the fight (Waxing Moon), The Pope takes a more orthodox approach, becoming more defensive and supportive while focusing on spellcasting.
She is considerably slower and not as hyper-active, but still packs quite a punch, and her defenses have been raised.
You will be dealing with higher area damage, and improper management of her slaves can easily turn the fight very chaotic.
Mobility requirements are lower, although the tank must avoid Castigatio, as it can't be soaked through Devotion.
Her normal sets of attacks includes high level Holy Light, Stun Attack plus Dark Cross, and Energy Drain plus Varetyr Spear combos.
Defensive effects aren't many, but they're effective. Assumptio coupled with Archangelus allow her to shrug a lot of damage off.
Area attacks include high level Wide Pressure and Wide Judex.
The main debuff to watch out for is Oratio.
The special abilities are underlined below.
| The Pope's (Waxing Moon) Special Abilities | ||
|---|---|---|
| Ability | Flavor Text | Description |
| Sanctuary | I'm getting a little dizzy... | Casts Ganbantein and drops a special version of Sanctuary on self, which recovers massive amounts of HP yet doesn't affect enemies. |
| Magnus Exorcismus | Strange paths to walk upon emerge under our feet. | This special version of the Priest's skill, inflicts damage regardless of the target's race or element. |
| Archangelus | You're forcing me to lay the probabilities low. | This buff is only active while the girl is chasing somebody, halving the damage taken and retaliating with high level Holy Punishment. Once cast, The Pope then buffs herself with Lv.10 Expiatio and picks a new target. |
| Call Agshekelot | This one was blessed as Love but never truly understood, for it devours all in dismay. | Invokes one Agshekelot, which is an aggressive slave that inflicts manageable but quick damage, debuffs with Deadly Poison and Bleeding, and also burns SP through Mental Breaker. Every 9s, it will inflict 10% of Max HP damage upon itself, and if it dies through this effect or normal damage, then one Golachab will spawn in its place. When that happens, another Agshekelot will be called. Golachab is a beefy spellcaster that uses a wide array of Fire property spells such as Fire Wave, Fire Ball, Dragon Fire Formation, Crimson Fire Formation and debuffs with Wide Burning and Wide Silence. Golachab will change its target every 30s. |
| Wide Confessio | Hell throbs from your lips, your gaze hovers with ignorance! | This ability is cast right after a full-screen Wide Dispel. Targeting everybody on screen, The Pope uses Confessio, which casts a flurry of 9 low level Holy Punishments, dealing Neutral property magical damage that splashes around and inflicts forced Silence. Spreading around is imperative to avoid stacking splashed damage. |
| Sacred Song | Spacious was my puzzled mind, lost in the endless maze of creation... | Coming right after Divine Shield, this skill will restore 10% of Pope's Max HP whle reducing All Stats of enemies on sight by 30% for 30s. It is possible to interrupt this skill with Spell Breaker or by tearing down the Divine Shield before cast goes off. |
| Castigatio | Dear madness, please don't let go of my hand... | For 10s, The Pope's next melee swing will inflict 20000% of ATK in damage and half of that in a medium area while ignoring FLEE, Perfect Dodge and all defensive effects. During this effect, The Pope won't use any skills so the current target must run away or die! |
Monsters
| Easy Mode Monsters | |||||||
|---|---|---|---|---|---|---|---|
| Name | Level | HP | Size | Race | Elements | Base EXP | Job EXP |
 Temple Guard |
114 | 36,600 | Medium | Demihuman | Neutral 1 | 140,370 | 112,305 |
 Fanatic |
116 | 40,260 | Medium | Demihuman | Neutral 1 | 161,430 | 114,660 |
 Zealot |
116 | 43,920 | Medium | Demihuman | Neutral 1 | 114,660 | 161,430 |
| Tracking Undog |
118 | 29,280 | Small | Undead | Undead 1 | 182,490 | 182,490 |
 Freyja's Bishop |
121 | 292,800 | Medium | Demihuman | Neutral 2 | 5,474,700 | 5,474,700 |
 Loomin |
128 | 1,464,000 | Small | Angel | Neutral 4 | 21,898,800 (MVP EXP: 8,321,550) | 17,519,040 |
 Frozen Heart (Summon) |
123 | 15 | Small | Formless | Water 3 | - | - |
| Normal Mode Monsters | |||||||
|---|---|---|---|---|---|---|---|
| Name | Level | HP | Size | Race | Elements | Base EXP | Job EXP |
| Temple Guard |
145 | 146,400 | Medium | Demihuman | Neutral 1 | 292,425 | 233,970 |
| Fanatic |
147 | 161,040 | Medium | Demihuman | Neutral 1 | 336,300 | 269,070 |
| Zealot |
147 | 175,680 | Medium | Demihuman | Neutral 1 | 269,070 | 336,300 |
| Tracking Undog |
149 | 117,120 | Small | Undead | Undead 1 | 380,175 | 380,175 |
| Freyja's Bishop |
152 | 1,756,800 | Medium | Demihuman | Neutral 2 | 16,424,100 | 16,424,100 |
| Loomin |
159 | 10,540,800 | Small | Angel | Neutral 4 | 65,696,400 (MVP EXP: 24,964,635) | 52,557,120 |
| Frozen Heart (Summon) |
154 | 30 | Small | Formless | Water 3 | - | - |
 Reflection of Ktullanux |
160 | 17,568,000 | Large | Formless | Water 2 | 98,544,600 (MVP EXP: 37,446,960) | 78,835,680 |
 Ice Colossus (Summon) |
154 | 878,400 | Large | Formless | Water 3 | - | - |


Dream Debris
Contained inside of ![]() Frozen Dream,
Frozen Dream, ![]() Dream Debris is the currency used to purchase goods from Shohreh, and to enchant the
Dream Debris is the currency used to purchase goods from Shohreh, and to enchant the ![]() Necklace of the Priestess.
Necklace of the Priestess.
Niren needs those strange dreamworld fragments to operate the Dream Rift and offers useful goods in exchange.
![]() Frozen Dream is obtained from the Oneiric Gatherings and by helping Medgga.
Frozen Dream is obtained from the Oneiric Gatherings and by helping Medgga.
If you manage to recover and return the ![]() Old Doll to The Pope just before finishing the instance, you will be awarded with a certain amount as well.
Old Doll to The Pope just before finishing the instance, you will be awarded with a certain amount as well.

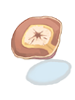
Oneiric Gathering
These strange clusters are formed upon defeating a Freyja's Bishop, or any of the MVPs inside the instance.
Upon clicking one, they burst into many ![]() Frozen Dreams. The amount is based on the enemy defeated, and the current Difficulty Mode.
Frozen Dreams. The amount is based on the enemy defeated, and the current Difficulty Mode.

Medgga
This furry traveler from a far away land, will ask you for two ![]() Pope Cookies, one for herself, and another for her husband.
Pope Cookies, one for herself, and another for her husband.
She will toss a pile a of ![]() Frozen Dreams at you for the help, this amount increases with the difficulty mode.
Frozen Dreams at you for the help, this amount increases with the difficulty mode.
Old Doll
This is the lost doll Tilby that The Pope tells you about at the beginning. By recovering it, you can obtain additional rewards upon finishing the instance.
Additionally, this item is required to initiate the optional fight with The Pope in the Hard Mode of this instance.
Upon defeating either of the three first Freyja's Bishops, they will drop something shiny, in a Glowing Spot.

Glowing Spot
Approach and inspect it, you might discover the ![]() Old Doll, or nothing at all.
Old Doll, or nothing at all.
There is 25% chance to find the doll, and if you inspected the first two but found none, the third is guaranteed to contain the doll.
However, if you forgot to check a spot, you may miss the doll!
Mercenary
The Pope will aid you in combat during most of the fights, joining you as a Mercenary.
Once you're ready to leave the temple, you will be able to choose her outfit, altering the stats and skills.
Papal Attire provides higher DEF, MATK and INT, while ASPD and MSPD are lowered. The skill set is oriented towards tanking and support.
Casual Attire results in higher MDEF, ATK and DEX, while increasing ASPD and MSPD. The skill set focuses on offense with moderate support.
The Mercenary Scrolls sold by Shohreh allow you summon this little helper for 30 minutes.
|
| ||||||||||||||||||||||||||||||
Muddy Mirror
It it possible to avoid her help by interacting with the mirror located in the very first room. Doing so will disable the mercenary for the current run.
Rewards
Zone Drops
Most monsters drop Blue and White Potions so be sure to use those!
Notable Zone Drops
| Notable Zone Drops | |||
|---|---|---|---|
| Item | Monster | Type, Jobs and Required Level | Stats |
 |
Temple Guard | Type: One-Handed Sword Weapon Level: 4 Jobs: 3rd Swordsman, Thief, Merchant Required Level: 100 |
Weight: 150 Attack: 170 Grants 20% chance for physical attacks to be unavoidable. Enables the use of Lv.7 Holy Cross. Autocasts Lv.5 Joint Beat after using Holy Cross or when physically attacking by a chance based on the Refine Level. Every 2 Refine Levels; Increases damage of Holy Cross by 40% |
 |
Temple Guard | Type: Armor Jobs: Assassin Cross and Stalker Required Level: 70 |
Weight: 30 Defense: 46 AGI +3 HIT +10 ASPD +8% [Set Bonuses] Sucsamad Autocasts Lv.5 Whirlwind Kick when physically attacking by a chance. Every Refine Level of the Armor; increases the chance. |
 |
Zealot and Fanatic | Type: One-Handed Axe Weapon Level: 4 Jobs: 3rd Swordsman, Thief, Merchant Required Level: 100 |
Weight: 150 Attack: 200 MATK +105 Increases Physical and Magical damage done to Undead race by 20% Autocasts Lv.5 Blessing on self when physically or magically attacking by a chance. |
 |
Tracking Undog | Type: Dagger Weapon Level: 4 Jobs: Swordsman, Mage, Archer, Merchant, Thief, Soul Linker and Ninja Required Level: 36 |
Weight: 80 Attack: 195 FLEE +10 Perfect Dodge +5 DEF -50% |
 |
Freyja's Bishop | Type: One-Handed Staff Weapon Level: 4 Jobs: 3rd Mage and Acolyte Required Level: 100 |
Weight: 150 Attack: 170 MATK +190 Element: Earth Inflicts Blind status when magically attacking by a chance. Every Refine Level; Increases Magical damage done with Earth property spells by 4% Autocasts Stone Rain after using an offensive, single-target spells by a chance based on the Refine Level. |
 |
Freyja's Bishop | Type: Armor Jobs: Priest and Monk Required Level: 70 |
Weight: 100 Defense: 65 MDEF +15 Grants immunity to Blind status. Every trained Lv. of Demon Bane; SP Regeneration +5% |
 |
Temple Guard | ||
| |
Freyja's Bishop | ||
MVP Drops
The drop chances increase with the chosen difficulty mode.
|
|
| |||||||||||||||||||||||||||||||||||||||||||||||||||||||||||||||||||||||||||||||||||||||||||||||||||||||||||||||||||||||||||


Cards
All cards, including those from MVPs, have a 0.10% drop chance.
| Cards | |||
|---|---|---|---|
| Name | Slot | Prefix/Suffix | Stats |
| Temple Guard Card | Weapon | Aswar's | ATK +10 HIT +5 [One-Handed Sword] If Refine Level is +7 or higher; ATK +20 HIT +10 If Refine Level is +9 or higher; ATK +10 HIT +5 |
| Freyja's Bishop Card | Footgear | of Metanoia | Autocasts Lv.1 Judex when physically or magically attacking by a low chance. Every Refine Level; Increases the chance. Increases Physical and Magical damage done to Demihuman and Demon races by 5% If Refine Level is +9 or higher; Reduces damage taken from Demihuman and Demon races by 5% |
| Loomin Card | Accessory | of Eleleth | Effects from multiple cards do not stack. Increases Physical and Magical damage done to Shadow and Undead property targets by 15% Enables the use of Lv.5 Duple Light and Aspersio. |
| Reflection of Ktullanux Card | Weapon | of Helvegr | Effects from multiple cards do not stack. Grants Hel's Scorn status as long as the card is equipped, adding 20% additional Water property damage to all attacks. |
| The Pope Card | Upper Headgear | Dark Night of the Soul's | Enables the use of Lv.3 Sacred Song, which affects allies and enemies within 9 cells. This song recovers 30% of Max HP to self and party members, while also reducing All Stats of enemies by 15% for 15s. |
Shohreh
This flirty smuggler was caught red-handed by Niren and now handles her under-the-table business.
She will exchange Dream Debris needed to operate the Dream Rift for a wide array of good which come from the hands of Temple's craftsmen, and some other stuff their enforcers have confiscated.
To unlock her shop, you must first fully clear the instance in Easy Mode, and as you clear other difficulties, more articles are added to the list.
| Shohreh's Catalogue | ||||
|---|---|---|---|---|
| Item | Cost | Difficulty | Type, Jobs and Required Level | Stats |
 |
3000 | Easy | Type: Accessory Jobs: All Required Level: 100 |
Weight: 20 MDEF +5 AGI +3 Reduces damage taken from Melee Physical attacks by 2% Grants Lv.1 Kyrie Eleison status for for 5 sec when melee physically attacking with normal attacks and skills by a low chance. |
 |
3000 | Easy | Type: Accessory Jobs: All Required Level: 100 |
Weight: 40 Defense: 20 VIT +3 Reduces damage taken from Magical attacks by 2% Restores 1% of Max HP/SP when magically attacked by a chance. |
 |
1000 | Normal | Type: Upper Headgear Jobs: All Required Level: 100 |
Weight: 60 Defense: 20 After-cast Delay -15% Reduces damage taken from all races by 3% If Refine Level is +7 or higher; Max HP & SP +4% If Refine Level is +9 or higher; ATK +6% [Arch Bishop] Flee +20 [Set Bonuses] Necklace of the Priestess Recovers 300 HP/5s Recovers 6SP/5s |
 |
1000 | Normal | Type: Upper Headgear Jobs: All Required Level: 100 |
Weight: 40 MDEF +10 Healing Received +6% If Refine Level is +7 or higher; Reduces damage taken from all sources by 3% If Refine Level is +9 or higher; MATK +6% [Arch Bishop] Perfect Dodge +10 [Set Bonuses] Necklace of the Priestess Healing Done +6% |
 |
1500 | Easy | Type: Costumed Headgear Jobs: All | |
 |
1500 | Easy | Type: Costumed Headgear Jobs: All | |
 |
1750 | Hard | Type: Garment Jobs: All Required Level: 140 |
Weight: 60 Defense: 14 Grants 5% to dodge all direct attacks. Every Refine Level above +5 and up to +10; Further increases the chance by 1% Recovers 1% of Max SP and 2% Max HP upon avoiding an attack with this effect. |
 |
20 | Easy | Type: Consumable | WATK and MATK +2% Reduces damage taken from all elements except Neutral by 3% Duration: 10 min |
 |
180 | Easy | ||
 |
600 | Easy | Type: Consumable | Contains a random piece of equipment from the Easy Mode. |
| |
1400 | Normal | Type: Consumable | Contains a random piece of equipment from the Normal Mode. |
| |
2200 | Hard | Type: Consumable | Contains a random piece of equipment from the Hard Mode. |
 |
150 | Easy | Type: Consumable | Summons Level 120 Pope Mercenary in her Papal Attire. Duration: 30 min |
 |
150 | Easy | Type: Consumable | Summons Level 120 Pope Mercenary in her Casual Attire. Duration: 30 min |
| |
250 | Normal | Type: Consumable | Summons Level 150 Pope Mercenary in her Papal Attire. Duration: 30 min |
| |
250 | Normal | Type: Consumable | Summons Level 150 Pope Mercenary in her Casual Attire. Duration: 30 min |
| |
350 | Hard | Type: Consumable | Summons Level 170 Pope Mercenary in her Papal Attire. Duration: 30 min |
| |
350 | Hard | Type: Consumable | Summons Level 170 Pope Mercenary in her Casual Attire. Duration: 30 min |
 |
1000 | Easy | Type: Accessory (Right) Jobs: All Required Level: 100 |
Weight: 20 Account-bound. Max HP & SP +2% |
 |
500 | Easy | Type: Accessory Jobs: All Required Level: 90 |
Enables the use of Return to Rachel, transporting you to Rachel. |
Temple Assistant
Niren's aidee, this acolyte is in charge of rewarding your efforts towards the exporation of Pope's dream. You will be given one ![]() Necklace of the Priestess (per account) upon finishing the instance in Easy Mode.
Necklace of the Priestess (per account) upon finishing the instance in Easy Mode.
The necklace then be enchanted by her, and she will take large amounts of ![]() Dream Debris for the service.
Dream Debris for the service.
Necklace of the Priestess
This accessory is slotless, account-bound and requires level 100 to wear. Temple Assistant will grant it an enchantment which can be increased in level.
It also forms a set with ![]() Drooping Pope and
Drooping Pope and ![]() Sitting Pope headgears.
Sitting Pope headgears.
| Name | Type | Jobs | Level | Weight | Stats |
|---|---|---|---|---|---|
| Necklace of the Priestess |
Accessory (Right) | All | 100 | 20 | Max HP & SP +2% |
Enchantments
There are four different types, each with three levels, and you're able to obtain only one. The enchantments are not removable and there's no failure chance when increasing their level.
If you want a different enchantment, then you must buy another ![]() Necklace of the Priestess from Shohreh.
Necklace of the Priestess from Shohreh.
To increase the level of an enchantment, you must first complete the corresponding difficulty;
Level 1 requires Easy Mode cleared, Level 2 requires Normal Mode and Level 3, Hard Mode.
Each upgrade costs a hefty amount of ![]() Dream Debris, those costs are:
Dream Debris, those costs are:
Level 1: 500 ![]() Dream Debris.
Dream Debris.
Level 2: 3000 ![]() Dream Debris.
Dream Debris.
Level 3: 6000 ![]() Dream Debris.
Dream Debris.
| Enchantments | |||
|---|---|---|---|
| Enchantment Type | Level 1 | Level 2 | Level 3 |
 Justice of Freyja Justice of Freyja |
ATK +15 SP Regeneration +15% Pierces 3% of Hard DEF. |
ATK +30 SP Regeneration +30% Pierces 6% of Hard DEF. |
ATK +40 SP Regeneration +40% Pierces 9% of Hard DEF. |
 Grudge of Freyja Grudge of Freyja |
MATK +15 Max HP +200 Pierces 3% of Hard MDEF. |
MATK +30 Max HP +400 Pierces 6% of Hard MDEF. |
MATK +40 Max HP +600 Pierces 9% of Hard MDEF. |
 Insight of Freyja Insight of Freyja |
Reduces damage taken from all races by 1% FLEE +5 Recovers 1% Max HP/5s. |
Reduces damage taken from all races by 2% FLEE +10 Recovers 2% Max HP/5s. |
Reduces damage taken from all races by 3% FLEE +15 Recovers 3% Max HP/5s. |
 Mercy of Freyja Mercy of Freyja |
Healing Done +3% After-cast Delay -3% Recovers 0.25% Max SP/5s. |
Healing Done +6% After-cast Delay -6% Recovers 0.5% Max SP/5s. |
Healing Done +8% After-cast Delay -8% Recovers 0.75% Max SP/5s. |
Helpful Citizens
Kind Grandma
This elder woman resides in the Northwestern portion of the city and will gladly buff you with Level 10 Blessing and Increase Agility, and Level 5 Expiatio.
You will not be able to go back once you leave the temple's premises so her services are limited.
Related Quests
| NPC | Quest |
|---|---|
High Priestess Niren Rachel |
Name: Identify the Disturbance |
 Exit Portal Crescent in the Noon |
Name: Returning Tilby Rewards: Experience, Frozen Dreams |
 Eternally Hungry Dog Crescent in the Noon |
Name: Canine Troubles Rewards: Pope Cookies, Dead Branches, Flowering Branch, Bloody Branch |
| Instances |
|---|
| Airship's Assault • Bakonawa's Lake • Bangungot's Hospital • Bios Island • Buwaya's Cave • Crescent in the Noon • Devil's Palace • Endless Tower • Jitterbug's Nightmare • Malangdo Culvert • Memories of Sarah • Misty Forest Labyrinth • Mors' Cave • Nidhoggur's Nest • Octopus Cave • Old Glast Heim • Orc's Memory • Sealed Shrine • Infinite Space |