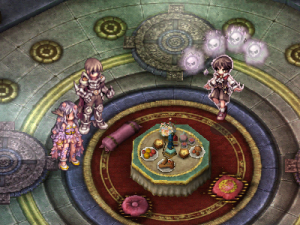
Devil's Palace
| Devil's Palace | |
|---|---|
| |
| Information | |
| Level Range: | 160+ |
| Party Requisites: | 1+ Player |
| Quest Prerequisites: | Bios Island (Quest) and Mors' Cave (Quest) |
| Duration: | 2 Hours |
| Cooldown: | 3 Days |
Overview
The final instance of the Episode 14.3, only accessible after clearing Bios Island and Mors' Cave.
Organize a powerful party and prepare yourself for the final showdown with Morroc, or Surt if we want to call things by their true names.
This instance features no normal monsters at all but a series of boss fights instead.
A large, geared and organized party, stocked up with consumables and catalysts is required to tackle this instance.
Bring capable damage dealers that can quickly reduce the massive amounts of HP, and healers that can deal with the constant harm that the whole party receives.
Background and Lore
After fruitlessly chasing down Morroc and getting toyed with by Ankou through Bios Island and Mors' Cave, Guardian Nidhoggur and Loki discovered the hiding place of the Demon King. To their horror, Morroc had regenerated completely and was reborn anew, largely thanks to your efforts. For some reason, Morroc took the form of a human child this time. His residence, being another pocket dimension, or perhaps Morroc's dream, is modeled like a bizarre palace of sorts, with whole areas lifted straight from Jotunheim and Muspelheim. He's really getting ahead of himself here.
Accompanied by Guardian Nidhoggur and Loki, your group advances through the trials imposed by Morroc as he keeps taunting everyone. After defeating the absurdly powerful guardians he had invoked, the group finally confronts him directly. At this point, Morroc states his intentions clearly: he desires to take the place of Ymir, bringing the current world to its end and becoming the God of the next one. Baffled by such lunacy, you're left with no option but to stop him once and for all.
Tips
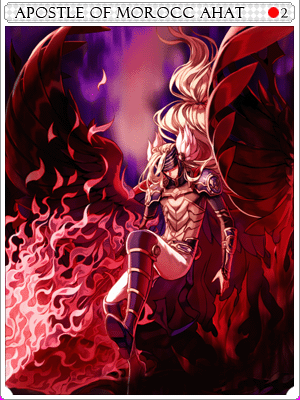
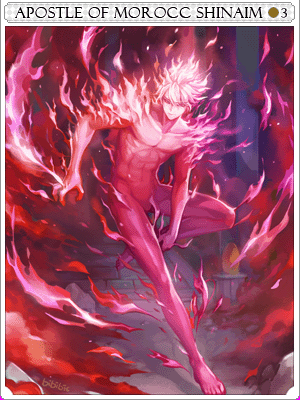
Right at the entrance, you will be met by the palace's gatekeepers, that you most likely already met before, Ahat and Shenime, which became Apostles of Morroc.
This fight works as a quick and deadly check to weed out groups that aren't ready yet to deal with Devil's Palace.
Shenime supports Ahat, while Ahat dishes out large amounts of damage and sometimes dispels the tank.
The next struggle is against Brinaranea, a powerful Ice Spider Matriarch from Jotunheim, or rather her animated corpse, controlled by the deceased Shenime.
Do not be deceived by the slow wind-up, she's pretty tricky and capable of easily disrupting your group.
Learn the layouts of her spells and either stand on dead spots or Land Protector, Ice Mine cannot be blocked though.
From time to time, mirages will be summoned, instantly attacking the closest target with Final Strike and then healing Brinaranea at an alarming rate, those will die to one area spell so pay attention.
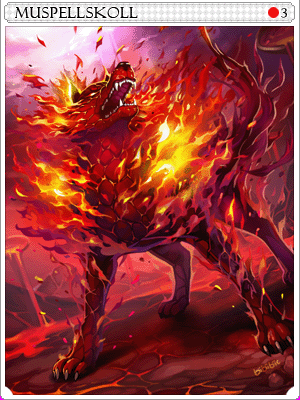
Right after, you will confront Muspelskoll, an exceedingly powerful and excitable servant of Morroc brought straight from Muspelheim and rewarded in advance with the tasty soul of Ahat.
Unlike Brinaranea, Muspelskoll is a straightforward and deadly fighter that can end your group in one breath.
If the tank ends up standing on a Flame Cross, he must quickly relocate as the damage may not be sustainable for the healers.
Not everything is as simple as it seems though, Muspelskoll will make use of the lava cauldrons to switch places and recover large amount of health from time to time.
This can be prevented by tossing Millenial Ice Crystals into them which will freeze the cauldrons for a moderate amount of time.
You can loot the crystals from Brinaranea's map and their amount is limited. If you group lacks damage output, you may very well not be able to get past this point.
After both beasts are dealt with, you will be able to confront Morroc himself. Before entering the final room, Guardian Nidhoggur may assist the group by creating an avatar of herself (mercenary) for the group's leader.
Keeping her buffed and alive will make the final fight easier.
At first, you will confront Reincarnated Morroc in his infant form. While not overly deadly, he will make the group take constant damage and upon reaching low HP, will teleport away and become
invulnerable while healing large amounts of HP constantly.
You must quickly kill the two aspects, Origin of Morroc and Repose of Morroc, that he had summoned to stop this.
Upon defeating the first form, Morroc will finally get serious, growing up and transforming into Desperate Morroc.
In this form, he will dish out large amounts of single-target and area damage as well as speeding up his attack speed as his HP dwindles.
Expect the screen to be filled with deadly spells and Morroc to summon powerful minions to assist him.
In both forms, Morroc will use increasingly more dangerous spells as you tear down his HP. If your group can't damage him fast enough, you may fail miserably.
Monsters
| Devil's Palace Monsters | |||||||
|---|---|---|---|---|---|---|---|
| Name | Level | HP | Size | Race | Elements | Base EXP | Job EXP |
 Devil's Avatar |
161 | 191,700 | Large | Angel | Shadow 1 | - | - |
 Devil's Avatar |
161 | 232,167 | Medium | Demon | Ghost 3 | - | - |
| Apostle Ahat |
165 | 9,000,000 | Large | Angel | Fire 2 | 42,825,000 (MVP EXP: 16,273,500) | 34,260,000 |
| Apostle Shenime |
165 | 8,000,000 | Medium | Demon | Water 2 | 44,985,000 (MVP EXP: 17,071,500) | 17,071,500 |
 Brinaranea's Hatchling |
165 | 319,500 | Large | Insect | Water 3 | - | - |
 Brinaranea |
170 | 66,000,000 | Large | Insect | Water 3 | 283,499,685 (MVP EXP: 107,729,895) | 226,799,760 |
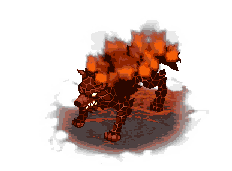
 Crazed Kasa |
165 | 231,250 | Large | Formless | Fire 4 | - | - |
 Crazed Salamander |
165 | 272,063 | Large | Formless | Fire 3 | - | - |
 Muspelskoll |
170 | 45,000,000 | Large | Brute | Fire 3 | 323,165,700 (MVP EXP: 122,802,975) | 258,532,560 |
 Reincarnated Morroc |
175 | 60,000,000 | Small | Demon | Holy 3 | - | - |
 Origin of Morroc |
170 | 6,516,000 | Large | Demon | Shadow 4 | - | - |
 Repose of Morroc |
170 | 2,900,000 | Large | Demon | Shadow 4 | - | - |
 Desperate Morroc |
175 | 90,000,000 | Medium | Demon | Shadow 2 | 737,693,325 (MVP EXP: 280,323,465) | 590,154,660 |
Rewards

Proof of Bravery
Once Morroc is no more, speak to Guardian Nidhoggur to receive your Proof of Bravery which can be used to purchase and enchant the Hero's Signet.
If you had accepted the quests from Hibba Agip and cleared Devil's Palace at least up to Morroc, Star Officer Abidal will reward you with another Proof of Bravery.

Hero's Prize
Desperate Morroc drops one Hero's Prize, which contains the new Heroic Equipment pieces along with some other goodies.
This chest had three loot groups and you will always get one random reward from each, with better rewards having a lower chance of coming out.
| Hero's Prize | |
|---|---|
| Reward | Loot Group |
 |
Group A |
 |
Group A |
 |
Group A |
 |
Group A |
 |
Group A |
 |
Group A |
 |
Group A |
 |
Group A |
 |
Group A |
 |
Group A |
 |
Group B |
 |
Group B |
| |
Group B |
 |
Group B |
 |
Group C |
 |
Group C |
 |
Group C |
 |
Group C |
 |
Group C |
 |
Group C |
 |
Group C |
 |
Group C |
 |
Group C |

Expedition's Reward Box
If your group managed to defeat Morroc, Hibba Agip will reward everyone with one Expedition's Reward Box, which contains the Devil's Essence "cards" and some other goodies.
Similar to Hero's Prize, this container has two loot groups and you will always get one random item from each.
| Expedition's Reward Box | |
|---|---|
| Reward | Loot Group |
 |
Group A |
| |
Group A |
| |
Group A |
 |
Group A |
| |
Group A |
| |
Group A |
 |
Group A |
| |
Group A |
| |
Group A |
 |
Group A |
| |
Group A |
| |
Group A |
 |
Group A |
| |
Group A |
| |
Group A |
 |
Group A |
| |
Group A |
| |
Group A |
 |
Group B |
 |
Group B |
 |
Group B |
| |
Group B |
 |
Group B |
MVP Drops
| Notable Zone Drops | ||
|---|---|---|
| Item | Monster | |
 |
Apostle Ahat | |
| |
Apostle Shenime | |
|
|
| ||||||||||||||||||||||||||||||||||||||||||||||||||||||||||||||||||||||||||||||||


Cards
Desperate Morroc Card is a normal MVP drop, while Apostle Ahat, Apostle Shenime, Brinaranea and Muspelskoll cards have a 0.10% drop rate.
| Cards | ||
|---|---|---|
| Name | Slot | Stats |
 |
Accessory | Effects from multiple cards do not stack. Max HP +10% [Set Bonuses] Apostle Shenime Card HP Regeneration +100% SP Regeneration +50% |
 |
Accessory | Effects from multiple cards do not stack. Max SP +10% [Set Bonuses] Apostle Ahat Card HP Regeneration +100% SP Regeneration +50% |
 |
Weapon | Increases Magical damage done with Water property spells by 20% [Set Bonuses] Muspelskoll Card Grants 10% to dodge all magical attacks |
 |
Shield | Reduces damage taken from Fire property targets by 40% [Set Bonuses] Muspelskoll Card Grants 10% to dodge all magical attacks |
 |
Footgear | ASPD +20% Fixed Cast Time -0.25s Variable Cast Time -1s [Set Bonuses] Mors Card Max HP +20% Max SP +10% |
Related Quests
| NPC | Quest |
|---|---|
 Commander Agip Fire Basin |
Name: The Demon King's Downfall Rewards: 1 Expedition's Reward Box |
Star Officer Abidal Fire Basin |
Name: Devil's Palace Subjugation Rewards: Varies |
Hisie Fire Basin |
Name: Orb's Magic Recovery Rewards: 1 Yggdrasil Berry |